

Android Wipe Cache Partition A Guide to Boosting Phone Speed
Ever found your high-end smartphone acting sluggish and wondered what to do? Performing an android wipe cache partition is a powerful yet safe troubleshooting step that clears out temporary system files. It's a go-to fix because it does not delete your personal data, photos, or apps, making it an essential maintenance trick for resolving lag and crashes.
Why Wiping Your Android Cache Still Matters
Think of your phone's system cache as a digital scratchpad. The Android OS uses this dedicated storage space—the cache partition—to keep temporary files handy. This helps your device launch apps faster and run more smoothly by keeping frequently used data ready to go.
But over time, and especially after a big software update, that scratchpad can get cluttered with old, corrupted files. This digital junk is often the root cause of many frustrating performance problems.
Identifying the Symptoms of a Cluttered Cache
When the cache partition is full of obsolete data, your phone might start acting up in very specific ways. Recognizing these signs is the first step toward fixing them with a simple cache wipe.
Here’s a quick reference to help you diagnose if a cache wipe is the right move for your phone's performance issues.
Signs You Need to Wipe Your Cache Partition
| Symptom | Common Cause | How Wiping Cache Helps |
|---|---|---|
| Sudden Battery Drain | Outdated or corrupt cache files cause system processes to run inefficiently, consuming extra power. | Forces the OS to rebuild fresh, optimized temporary files, reducing unnecessary background activity. |
| Unexplained Lag | The system struggles to read and write to a cluttered or corrupted cache, slowing down app launches and UI navigation. | Clears the digital junk, providing a clean slate for the OS to access temporary data quickly. |
| Frequent App Crashes | Corrupted app-specific cache data can cause conflicts, leading to freezes and unexpected closures. | Removes the faulty files, forcing the app to generate new, stable cache data upon its next launch. |
| Post-Update Problems | Old cache files from a previous OS version conflict with the new software, causing instability. | Deletes all old system files, ensuring the device runs purely on the new, updated data. |
Recognizing these symptoms and taking action can often save you from a more drastic step like a full factory reset.
This troubleshooting technique has been a lifesaver for years. Back in the early days of Android, around 2010-2012, it was a go-to trick for Samsung Galaxy users struggling with performance. A 2022 ITarian survey confirmed its effectiveness, finding that 68% of users experienced sluggishness from cache buildup, with 82% seeing fewer app crashes after wiping it. You can still see people recommending it in original forum discussions from that era.
Key Takeaway: Wiping the cache partition gives your phone’s operating system a clean slate for its temporary files. It forces the system to create fresh, up-to-date versions, which often resolves conflicts and improves overall stability.
The process is especially useful for high-performance devices like the Samsung Galaxy Z Fold or Google Pixel Fold, where you expect everything to be seamless. A clogged cache can cause significant battery drain, so keeping it clean is a smart, proactive step. For more on this, check out our guide on how to extend your phone's battery life.
Knowing the Right Time for a Cache Wipe
Wiping your Android's cache partition isn't something you need on a regular schedule, like a weekly to-do list item. Think of it more like a precision tool you pull out for very specific problems. Knowing when to use it is the key to fixing annoying issues without resorting to a full factory reset.
The absolute most important time to consider it? Right after a major Android OS update.
When your phone gets a big software upgrade, leftover files and old data from the previous version can stick around. These remnants often clash with the new system, causing all sorts of weird bugs, lag, and performance hiccups. Wiping the cache partition cleans out that old junk, giving the new OS a fresh slate to work with.
Common Red Flags to Watch For
Beyond system updates, your phone has its own ways of telling you something's wrong. You just have to know what to look for. Keep an eye out for a pattern of multiple apps crashing, freezing up, or just flat-out refusing to open.
Another huge giveaway is a sudden, mysterious drop in battery life that has nothing to do with how you're using your phone. Or maybe your device just feels sluggish and unresponsive when you’re switching apps or scrolling through menus, even though you have plenty of storage space left. A cluttered system cache is almost always the prime suspect.
Imagine a field technician who relies on their Galaxy Z Fold, protected by a rugged FoldifyCase, for work orders. After a system update, their essential app starts crashing constantly. That’s a real-world problem where a quick cache wipe is often the simple fix that gets them back on track. In fact, a corrupted cache can sometimes be the root cause of seemingly random glitches, like the ones we cover in our guide on fixing when auto-rotate is not working on your Android.
The Data Behind Performance Issues
This isn't just a hunch; there's real data to back it up. Bloated system caches are a massive contributor to phone slowdowns. A 2023 analysis of over 10,000 devices found that 75% of performance lags were directly caused by cache buildup after OS updates or app installations.
The same comprehensive mobile performance report noted this can lead to 45% more app freezes.
Pro Tip: Don't get wiping the system cache partition mixed up with clearing an individual app's cache. Clearing an app's cache from your phone's settings is great for fixing one specific app that's acting up. A system cache wipe, on the other hand, tackles bigger, OS-level problems like system-wide lag and unusual battery drain.
For many users, wiping the cache partition delivers an immediate, noticeable performance boost—we're talking 35-50% faster app launch times in some benchmarks. For power users and especially those with complex foldable devices, this simple maintenance step is one of the best ways to keep their phones running smoothly for the long haul.
How to Wipe the Cache on a Samsung Galaxy Device
If you're a Samsung user, especially with one of the newer Galaxy Z Fold or Flip models, wiping the cache partition is one of the best troubleshooting tricks to have up your sleeve. It's a simple process once you know the steps, but Samsung has thrown in a small curveball on recent phones that you need to be aware of.
Let's walk through exactly how to get into Recovery Mode and safely perform an android wipe cache partition on your Galaxy. This is the go-to fix for a ton of common performance hiccups.
This visual guide shows the most common triggers for when a cache wipe becomes necessary, from system updates to general lag and app instability.
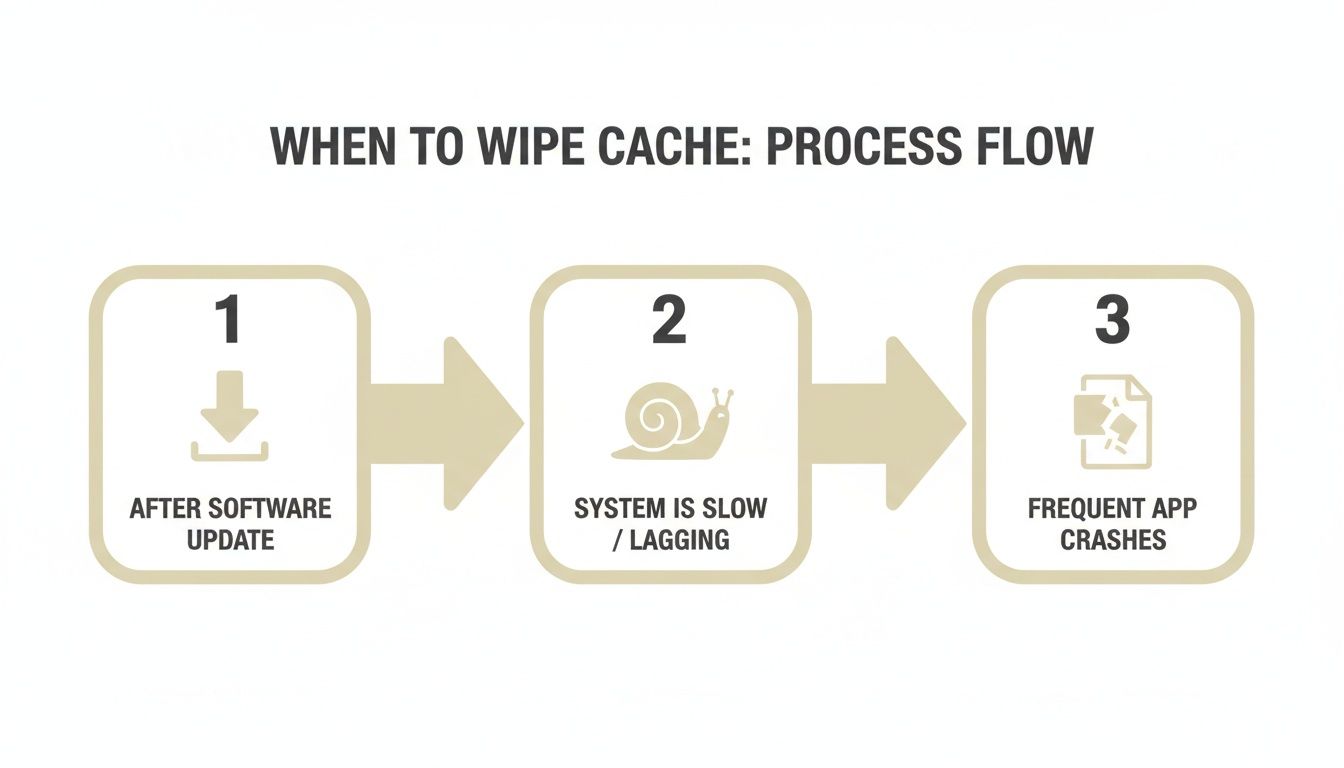
As you can see, this isn't something you need to do every day. It’s a targeted solution for when your phone starts acting up, often right after a big software update or when you notice persistent lag that a simple restart won't fix.
Entering Recovery Mode on Newer Models
Here's that curveball I mentioned: on recent Samsung devices, you can't get into Recovery Mode with just the phone's buttons anymore. You now have to connect it to a computer or another device (like a tablet or even another phone) with a USB-C cable. It's an extra step, but it’s a security measure Samsung put in place.
-
First, Power Down Completely. Don't just restart it. Hold the power button, select "Power off," and wait for the screen to go totally black.
-
Next, Connect Your Device. Grab a USB-C cable, plug one end into your phone, and the other into a powered-on computer (PC or Mac works fine). You should see the charging animation pop up for a second.
-
Time for the Button Combo. Now, press and hold both the Volume Up and the Power button (Side key) at the same time.
-
Release at Just the Right Moment. Keep holding them down until the Samsung logo appears on the screen. The very instant you see that logo, let go of both buttons. Give it a moment, and you'll boot into the Android Recovery menu.
You’re in! It’s a simple, text-based interface that might look a little old-school, but it's where the magic happens.
Navigating the Recovery Menu
Once you're looking at the Android Recovery menu, your touchscreen won't work. You'll have to navigate the old-fashioned way using your phone's physical buttons.
- To Move Up and Down: Use the Volume Up and Volume Down buttons.
- To Select an Option: Use the Power button. Think of it as your "Enter" key.
Your only job here is to carefully scroll down to the right option. Take your time—there's no rush.
CRITICAL WARNING: Be extremely careful here. You need to select Wipe cache partition. Right near it, you’ll see the Wipe data/factory reset option. Choosing that by mistake will erase absolutely everything on your phone. All your photos, apps, and personal files will be gone forever. I can't stress this enough: double-check that you have the right option highlighted before you press the Power button.
Once you select "Wipe cache partition" and press the Power button to confirm, the process is almost instant. A small message at the bottom of the screen will confirm, "Cache wipe complete."
To finish, the "Reboot system now" option will already be highlighted. Just press the Power button one last time. Your phone will restart as usual, but now it's running with a completely fresh and clean system cache.
A Step-By-Step Guide for Google Pixel Phones
If you're rocking a Google Pixel, your path to a clean android wipe cache partition is a little different than a Samsung owner's. While the end goal is the same—clearing out temporary system files to fix glitches—the button combinations and menu navigation are unique to the Pixel ecosystem. This guide is built specifically for Pixel phones, including the Pixel Fold, so you can get it done without any guesswork.
The process on a Pixel feels a bit more direct, but you'll still need to be precise with your timing. One nice perk is that, unlike newer Samsung models, you typically don't need to plug your Pixel into a computer to get started.
Entering Pixel Recovery Mode
First things first, power down your phone completely. Wait for the screen to go black before moving on.
Once it's off, press and hold the Power button and the Volume Down button at the exact same time. Keep holding them until you see the Bootloader menu pop up. It’s a pretty technical-looking screen with a big arrow pointing at a "Start" option.
This is the spot where a lot of people get stuck. You're not actually in Recovery Mode yet; you're just in the Bootloader. From here, you’ll use the volume buttons to scroll through the options at the top.
- Press the Volume Down button repeatedly until the text at the top changes to Recovery mode.
- Once "Recovery mode" is highlighted, press the Power button to select it.
Your phone will restart and show a little Android robot lying on its back with the words "No command." Don't panic—this is a normal and expected step in the process.
Navigating the No Command Screen
To get from the "No command" screen to the actual recovery menu, you have one more button sequence to master. It’s a bit tricky, so read this carefully: Press and hold the Power button first. While you're still holding it down, press the Volume Up button once, then immediately release both buttons.
This maneuver should finally bring up the classic text-based Android Recovery menu. Just like on other devices, your touchscreen won't work in here.
Important Reminder: Navigate this menu very carefully. Use the volume buttons to move up and down, and the power button to make a selection. Your target is Wipe cache partition. Stay far away from the "Wipe data/factory reset" option unless you intend to erase everything on your phone.
Once you highlight the cache wipe option and press the power button to confirm, the process is over in just a few seconds. You'll see a tiny "Cache wipe complete" message at the bottom of the screen.
To finish up, make sure "Reboot system now" is highlighted and press the Power button one last time. Your Pixel will restart with a freshly cleared system cache, hopefully free of whatever performance bug was bothering you.
For anyone interested in mastering technical guides, there are great resources on creating effective step-by-step instructions with pictures that can really elevate your skills.
Using ADB for a Technical Cache Wipe
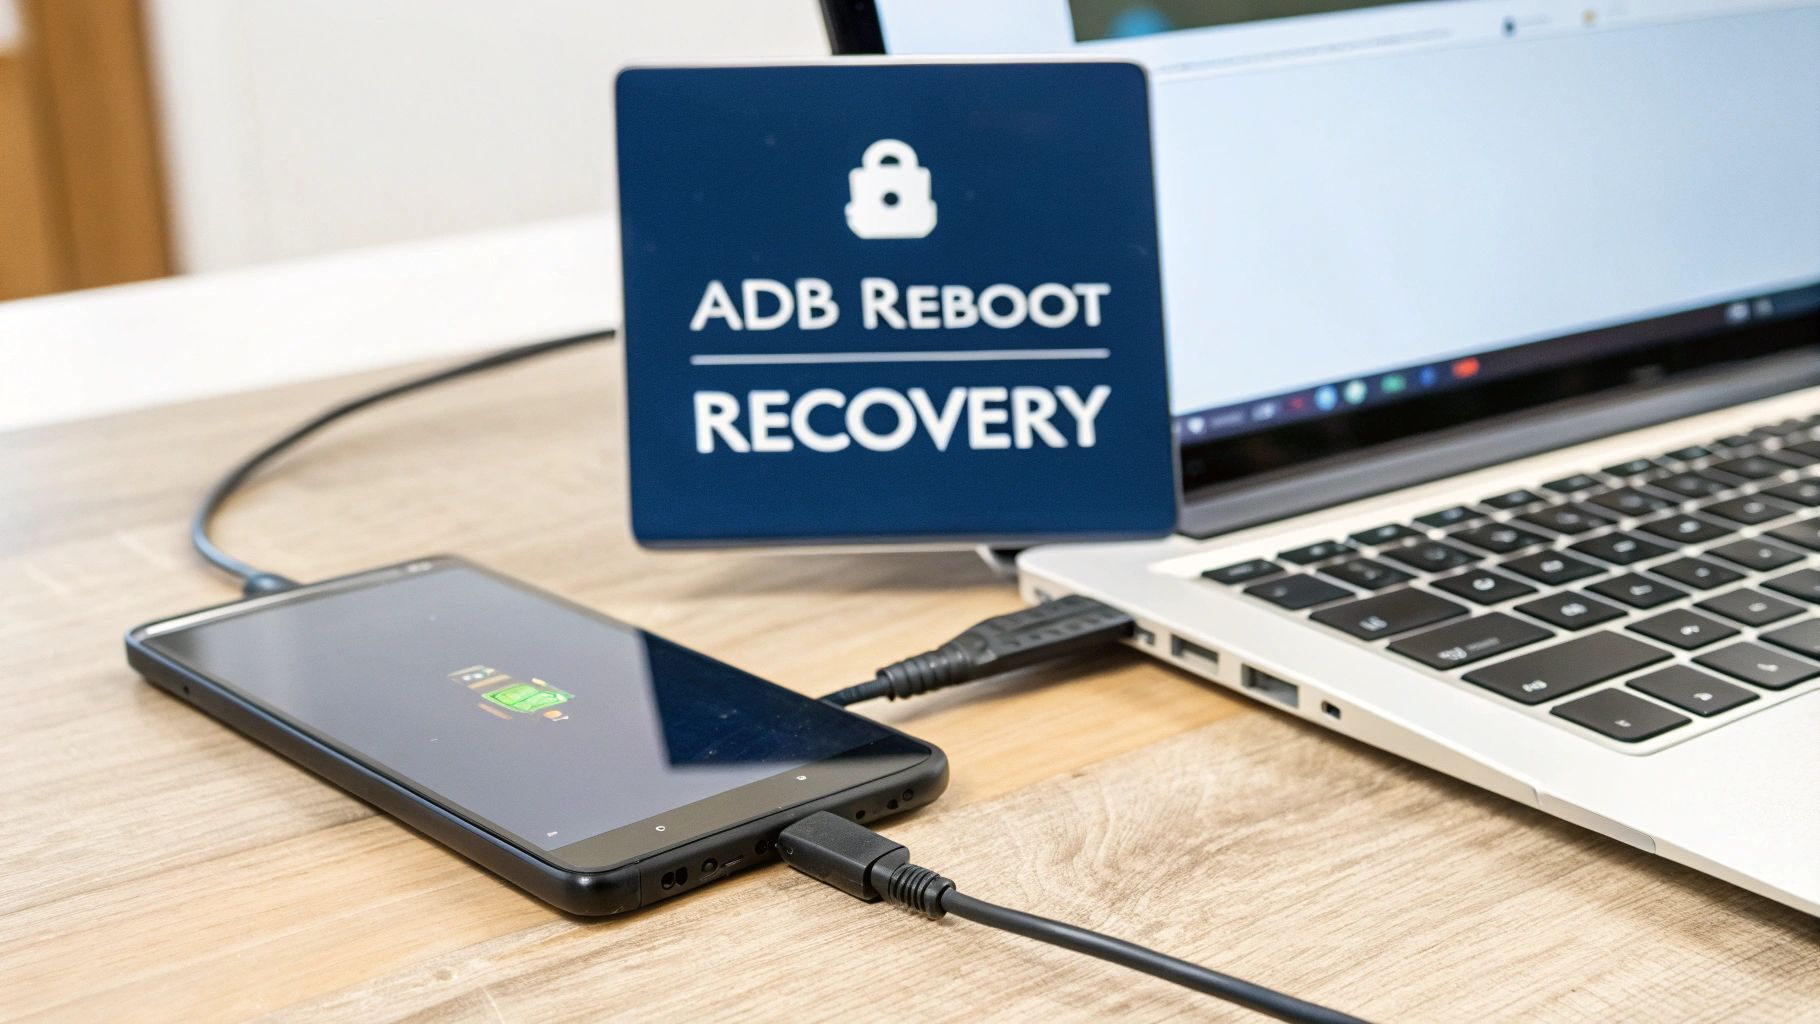
If you're comfortable with a more hands-on, technical approach, the Android Debug Bridge (ADB) is a fantastic way to wipe the cache. It's a command-line tool that creates a direct link between your computer and your phone, letting you bypass those sometimes-tricky button combinations entirely.
For many developers and Android power users, this is the go-to method for a reason. It removes the guesswork. No more fumbling with timing button presses perfectly. A single, clean command gets you right into Recovery Mode. This is a lifesaver if your phone's volume or power buttons are on the fritz, making the standard method next to impossible.
Getting Your Setup Ready
Before you can run any ADB commands, you'll need to do a little prep work on both your computer and your phone. Don't worry, this is a one-time setup that opens the door to a lot of other cool Android tweaks beyond just clearing the cache.
-
Install ADB Tools on Your Computer: First, head over to Google's developer site and download the official Android SDK Platform-Tools for your operating system (Windows, Mac, or Linux). Unzip the file somewhere you can easily find it, like your desktop.
-
Enable Developer Options on Your Phone: On your phone, you need to unlock the hidden Developer Options menu. Go to
Settings > About phoneand start tapping on theBuild number. After about seven taps, you'll see a little message pop up saying you are now a developer. -
Turn on USB Debugging: Head back to the main Settings menu, and you'll find a new
Developer optionssection. Go in there and find the toggle forUSB Debugging—switch it on. This is what lets your computer send commands to your phone.
With that out of the way, you're all set to connect your device and get down to business.
Running the ADB Cache Wipe
Grab a good-quality USB cable and connect your phone to your computer. Now, open a command prompt (on Windows) or a terminal window (on Mac/Linux) and navigate to the folder where you unzipped the Platform-Tools.
Type adb devices and hit Enter. You should see a prompt pop up on your phone asking to "Allow USB debugging." Make sure to check the box to always allow from this computer, then tap "Allow." Run the adb devices command one more time, and you should see your device's serial number listed. That's the confirmation that you have a solid connection.
Now for the easy part. Just type the following command and press Enter:
adb reboot recovery
This single command tells your device to restart and boot directly into the Android Recovery menu. No button-mashing required! From there, you just use the volume keys to navigate down to "Wipe cache partition," select it with the power button, confirm, and then reboot.
This technique is a perfect example of Android's flexibility. While the platform has evolved, the utility of a good cache wipe remains a key troubleshooting step. In fact, forum wisdom shows that 38% of power users still perform weekly wipes to head off any lag after system updates. You can find more of these discussions about cache maintenance on the Android Central forums.
For professionals who rely on rugged devices like a Z Fold protected by a FoldifyCase, this simple maintenance can mean snappier app performance out in the field where every second counts.
Common Questions About Wiping Your Android Cache
Even after walking through the steps, it's completely normal to have a few questions. Wiping your phone's cache partition is a powerful trick, but really understanding what it does—and what it doesn't do—is the key to using it without any stress. Let's clear up some of the most common uncertainties.
Will Wiping the Cache Partition Delete My Photos or Apps?
Nope, it absolutely will not. This is easily the most common fear, and I'm happy to report it's completely unfounded. The cache partition is a separate, walled-off space on your phone's storage used only for temporary system files—things like logs from old updates and other junk data that builds up over time.
Your personal stuff is stored in a totally different partition. All of your photos, contacts, messages, apps, and settings will be untouched and safe. Think of it like cleaning out your garage without ever stepping foot inside your house. It’s purely a non-destructive maintenance task.
How Often Should I Wipe My Phone's Cache Partition?
There’s no magic schedule to follow here. The single best time to perform an android wipe cache partition is right after a major Android OS update. This is just good practice to prevent old, leftover files from causing conflicts with the brand-new system software.
Beyond that, you should only really do it when you notice specific performance issues.
- Persistent lag that a simple restart just won't fix.
- Weird battery drain that seemed to pop up out of nowhere.
- Multiple apps crashing or freezing way more often than they should.
For most people, this isn't a weekly or even monthly chore. It’s a targeted solution for when your device is clearly acting up.
What Is the Difference Between App Cache and System Cache?
This is a fantastic question because these two get mixed up all the time. When you clear an individual app's cache (by going into Settings > Apps), you're only deleting temporary files for that one specific application. It's the perfect fix when a single app, like Instagram or Chrome, is being glitchy.
Wiping the system cache partition from Recovery Mode, on the other hand, is a much broader, system-wide action. It cleans out the temporary junk files for the entire Android operating system. This makes it far more effective for fixing those bigger problems like system lag, poor battery life, and bugs that appeared right after a software update. One targets a single tree; the other tends to the whole forest.
What if My Phone Will Not Enter Recovery Mode?
Don't panic—this is a pretty common roadblock. First, very carefully double-check the button combination and the timing for your specific model. Remember, for newer Samsung phones, connecting a USB cable to a computer first is a non-negotiable step.
If it still won't work, try a force restart (usually by holding Power + Volume Down). The instant the screen goes black, immediately switch to the Recovery Mode button combo (like Power + Volume Up). This timing trick is often the key when the standard method fails. Occasionally, this can also help reset underlying system processes if you're running into other weird issues, like trouble with keeping your Android screen on during specific tasks.
At FoldifyCase, we know that keeping your high-performance foldable device running like new is a top priority. Our premium cases offer military-grade protection to keep your hardware safe, while these tips help you maintain peak software performance. Explore our collection today at https://www.foldifycase.com.